Introduction to 3D Printing Design
This workshop will introduce you to advanced techniques in 3D printing and design. Topics will include design for 3D printing, print orientation, converting file formats, modeling by programming, creating a 3D topo map, 3D scanning, embedding a 3D model on a website, web-based slicers, printing on fabric, compliant design, and specialty filaments. In addition to the software used in Introduction to 3D Printing Software, you will be introduced to other free design programs, including Meshlab, MorphoSource, OpenSCAD, Codeblocks, TouchTerrain, Polycam, Kiri Moto and more.
This workshop provides 10 hours of hands-on learning, resulting in 1 continuing education unit (CEU).
This workshop provides 10 hours of hands-on learning, resulting in 1 continuing education unit (CEU).
Design for 3D printing
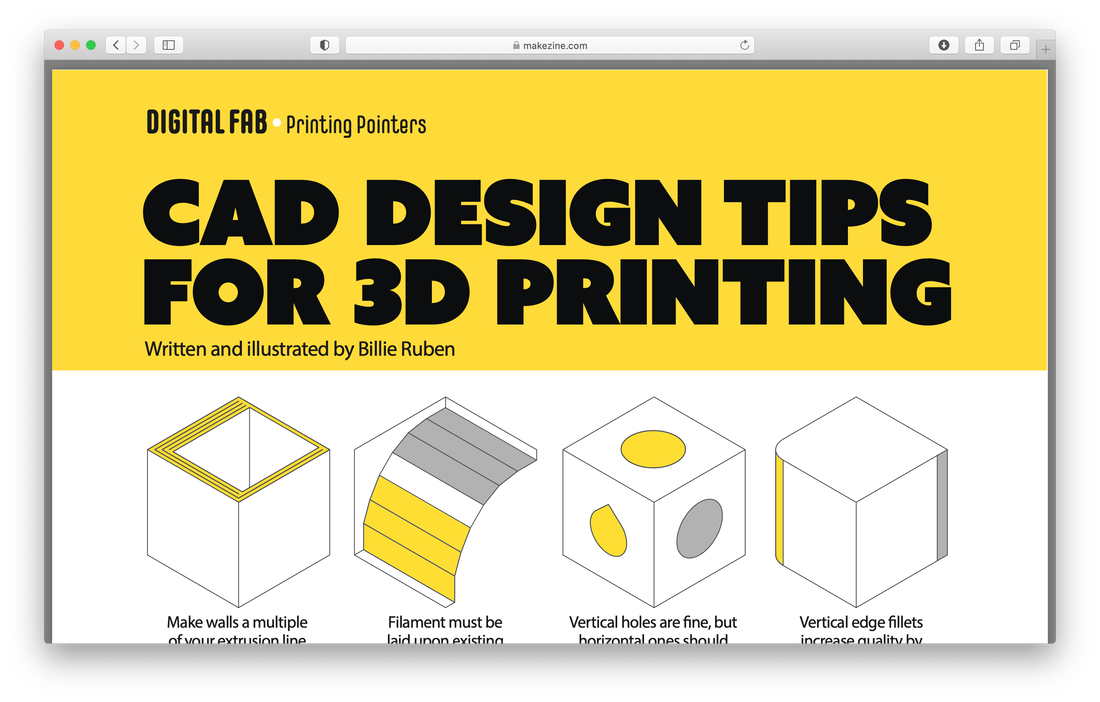
The process of 3D printing--building an object layer by layer--presents some unique design challenges. For example, unsupported overhangs will not print properly. Many printing issues can be ameliorated or avoided altogether with thoughtful design.
Resources: Design for 3D printing
- How to design parts for FDM 3D printing (website)
- Ultimate guide: How to design for 3D printing (website)
- CAD design tips for 3D printing (poster)
Lesson: Creating a design with 3D printing in mind
- Design with 3D printing in mind (slideshow)
Assignment: Create a design with 3D printing in mind
- Create a model that incorporates at least three of the design principles covered in the preceding lesson and resources
- Print your model
- Take clear, detailed photos of your model
- Upload your STL file and photos to Tinkecad
- Make the design public (learn how)
- In the design description state which design principles you incorporated into your model (learn how to access the design description)
- Copy the public link for your design (learn how)
- Use the contact form on the homepage of this site to send me public link to your design
Print Orientation
How you orient your model on the print surface can make a significant difference in the appearance, functionality, strength, and print time of your printed model. The resources below provide an overview of how model orientation affects final prints.
Resources: Print orientation
- Starters Guide to 3D Printing: Orientation (article)
- The best way to orient your 3D prints (video)
- How to orient 3D prints (video)
- 3D print orientation can matter (video)
- Pushing 3D printing with ... a plate? (video)
Lesson: Exploring how print orientation affects strength
Assignment: Explore how print orientation affects strength
- Using the preceding lesson as a guide, create and print orientation test models
- After both models are printed, try slowly bending each model
- Note how each model behaves when force is applied
- Take clear, detailed photos of the two models post-test
- Upload your STL files and photos to Tinkecad
- Make the design public (learn how)
- Copy the public link for your design (learn how)
- Use the contact form on the homepage of this site to send me public link to your design
Meshlab
You will come across many 3D models that are not in STL format. Flashprint will accept OBJ format models as well as STL files, but what if you come across a model that is in neither of those formats? In such cases you can use software programs like Meshlab and Fusion360 to convert the model to STL format, which you can then slice and print.
Lesson: Converting a PLY file from MorphoSource to an STL file using Meshlab
- How to search MorphoSource using biological taxonomy (slideshow)
- King Philip Called Out For a Good Sandwich
- Kingdom: Animalia
- Phylum: Chordata
- Class: Mammalia
- Order: Primates
- Family: Hominidae
- Genus: Homo
- Species: Homo erectus
- King Philip Called Out For a Good Sandwich
- How to convert a PLY file to an STL file using Meshlab (slideshow)
- How to reduce the file size and triangle count of a large STL file (video)
Assignment: Convert a PLY file from MorphoSource to an STL file using Meshlab
- Using the preceding lesson as a guide, search MorphoSource for a homo erectus model
- Download the model and import it into Meshlab
- Export the model from Meshlab as an STL file
- Upload the STL file to Tinkercad and make the design public (learn how)
- In the design description be sure to cite MorphoSource as your source (learn how)
- Import your STL file into Flashprint and scale down to 20%
- Add supports, slice, and export as a GCODE file
- Print your GCODE file on your Finder
- Take clear, detailed photos of your printed model
- Upload the photos of your print to Tinkercad
- Copy the public link for your design (learn how)
- Use the contact form on the homepage of this site to send me public link to your design
Resources: Meshlab and MorphoSource
- Meshlab (website)
- YouTube channel (video)
- Support forum (website)
- MorphoSource (collection)
- YouTube channel (video)
- User documentation (wiki)
Modeling by programming
OpenSCAD and Codeblocks are two programming languages specifically designed for creating 3D models. Why bother writing code to create models? At first, it might seem like writing a program for a single model takes much more time than simply creating that model in a CAD program. This is true. But if you need to create many variations of your original model, an OpenSCAD or Codeblocks program can make that process fast and easy; whereas creating each model variation from scratch in a CAD program would take much longer.
OpenSCAD
Lesson: Using OpenSCAD to create a jigsaw puzzle
- Using OpenSCAD to create a jigsaw puzzle (slideshow)
Assignment: Use OpenSCAD to create a jigsaw puzzle
- Using the preceding lesson as a guide, create a jigsaw puzzle model using OpenSCAD and Tinkercad
- Make the design public (learn how)
- In the design description be sure to cite the Tinkercad source (learn how)
- Slice your STL file with Flashprint and print on your Finder
- Take clear, detailed photos of your printed model
- Upload the photos of your print to Tinkercad
- Copy the public link for your design (learn how)
- Use the contact form on the homepage of this site to send me public link to your design
Resources: OpenSCAD
- OpenSCAD (software)
- OpenSCAD (video)
- OpenSCAD (article)
- OpenSCAD basics (article)
- Create a simple knob in OpenSCAD (article)
Codeblocks
Tinkercad includes a built-in, block-style programming language called Codeblocks. You can use Codeblocks to iterate 3D models very quickly.
Lesson: Creating a radiating sun pattern using Codeblocks
Assignment: Create a radiating sun pattern using Codeblocks
- Using the preceding lesson as a guide, re-create the ray generator program in Codeblocks
- You are encouraged to make changes to your program: add new variables, use different shapes...even write a completely new program if you wish
- Make your Codeblocks program public (learn how)
- Export your Codeblocks design as an STL file
- Slice and print your model
- Take clear, detailed photos of your printed model
- Upload your STL file and your photos to the 3D Designs area in Tinkercad
- Make the design public
- Copy the public link for your design (learn how)
- Use the contact form on the homepage of this site to send me public link to your Codeblocks program and the public link to your design
Resources: Codeblocks
- Codeblocks activities (website)
- Hour of code (website)
- Creating with Codeblocks (YouTube playlist)

TouchTerrain
TouchTerrain is a free web-based application created by Iowa State University. The app generates three-dimensional topographic map models and exports those models as STL files.
Lesson: Creating a 3D topo map using TouchTerrain
Assignment: Create a 3D topo map using TouchTerrian
- With the preceding lesson as a guide, use TouchTerrain to create a 3D map of any location you wish (excluding Mount Desert Island)
- Slice and print your model
- Take clear, detailed photos of your printed model
- Upload your model and photos to Tinkercad and make the design public (learn how)
- In the design description include the name of the location depicted in your topographic map and be sure to cite TouchTerrain as your source (learn how)
- Copy the public link for your design (learn how)
- Use the contact form on the homepage of this site to send me public link to your Codeblocks program and the public link to your design
3D Scanning
If this class were meeting in person it would have included a 3D scanning assignment. The scanner I use for in-person classes is the Structure Sensor Pro, which attaches to a standard iPad. If you would like to try your hand at 3D scanning, use the contact form to schedule an in-person meeting with me. There are also smart phone apps that can do 3D scanning. Once your scan has been exported to an STL file, it can then be imported into Tinkercad and manipulated, then exported, sliced, and printed! I'm happy to work with any of you who would like to, and who are able to, try this out. Once you have a self-scan, there are lots of fun possibilities! Besides simply printing a statue of yourself, you can also add your face to an action figure, a Pez dispenser, even a Tinkercad robot (see video).
Resources: 3D scanning
- Polycam 3D scanner (app)
- EM3D 3D scanner (app)
Embedding a 3D model
You can embed an interactive image of one of your Tinkercad designs into a webpage, blog, or other online platform. Try rotating and zooming in and out of the embedded design above.
Lesson: Embedding a 3D model into a webpage
Web-based slicers
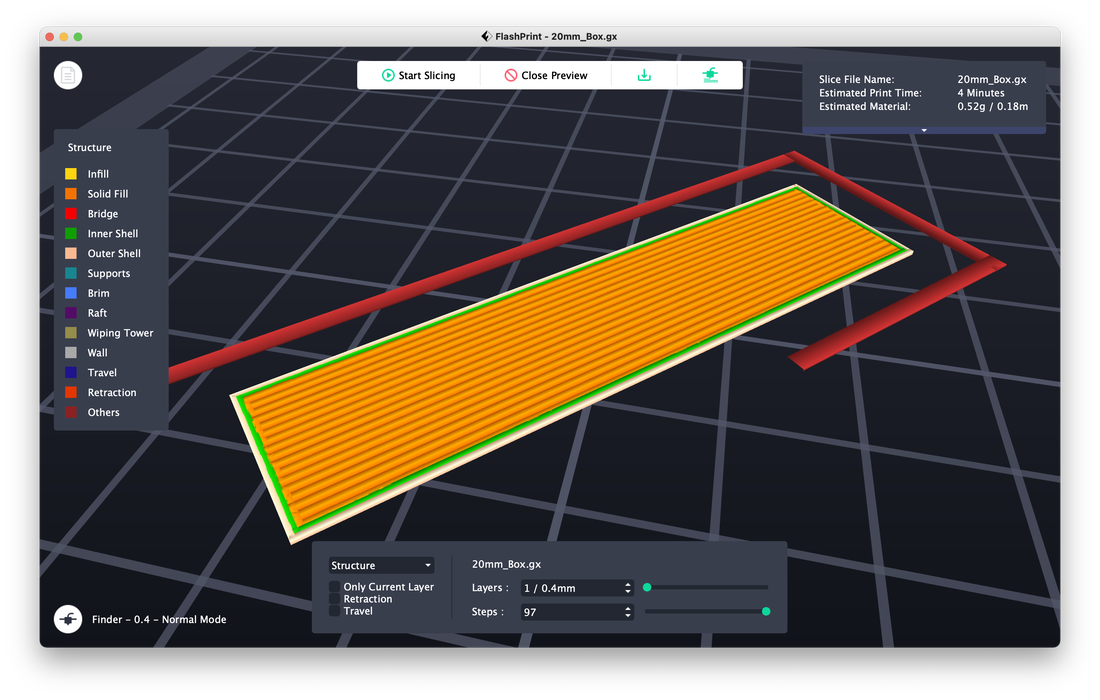
Want to be able to work through the 3D design-slice-print process entirely on your iPad? You can! You know that you can use apps like Shapr3D or Forger to create your models and export them to iCloud. And you know that if your printer has WiFi capabilities, you can send your sliced files that way. The missing piece, then, is the slicer. Flashprint is only available as a computer-based program. But there are several web-based slicing tools available. Though these slicers are more limited than Flashprint, they nevertheless allow you to have a completely mobile workflow.
- Polar3D
- Polar3D (Software)
- Preparing to print (Article)
- FlashCloud
- FlashCloud (Software)
- FlashCloud cloud use (Video)
- Kiri:Moto
- Kiri:Moto (Software)
- The definitive guide to Kiri:Moto (Video)
Printing on fabric
The basic technique for printing on fabric is this: In FlashPrint, you specify a pause after the first 2 or 3 layers have printed, then when the printer is paused, you secure a piece of sheer fabric over the print bed. As the print resumes, the fabric becomes embedded into the print.
- Printing on fabric (YouTube playlist)
- How to 3D Print on Tulle Fabric (article)

Compliant mechanisms
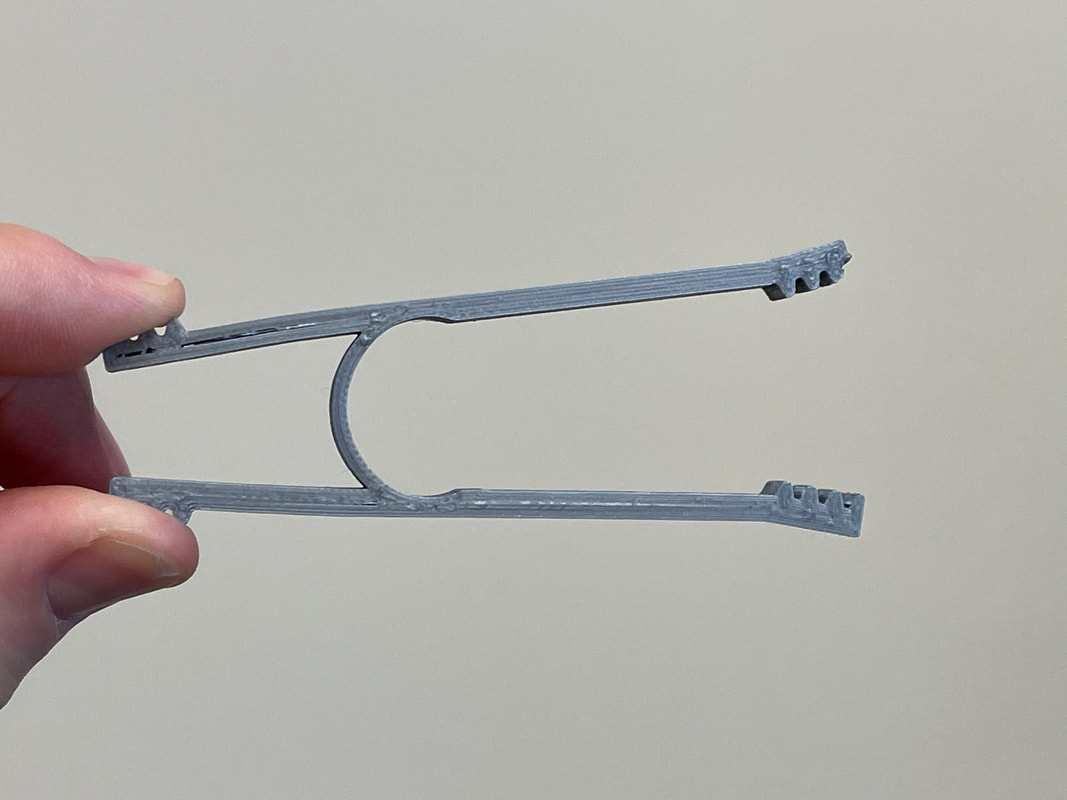
The movement of compliant mechanisms relies on the flexibility of the materials of which they are constructed. They are often composed of a single piece instead of multiple part parts. The natural flexibility of plastic makes 3D printing an ideal technique for creating compliant mechanisms.
Resources: Compliant mechanisms
- 3D printed compliant mechanisms (article)
- Compliant mechanism compilation ( video)
- 3D printed compliant mechanisms (video)
- Reusable spool with compliant springs (video)
- Compliant 3D models in Thingiverse (collection)
Assignment: Make a compliant mechanism
- Using Tinkercad of Shapr3D, design an original compliant mechanism
- Slice and print your model
- Take a series of photos of your printed model demonstrating its compliance (see samples below)
- Upload your photos to Tinkercad and make the design public (learn how)
- Copy the public link for your design (learn how)
- Use the contact form on the homepage of this site to send me public link to your Codeblocks program and the public link to your design

|
|
